Blog Layout

Drywall Taping Techniques for Corners and Angles

August 15, 2024

When it comes to drywall installation, the quality of the taping job can make or break the final appearance of your walls. Corners and angles, in particular, present unique challenges that require precision and skill to achieve a seamless finish. At Windsor Drywallers, we specialize in delivering flawless drywall results, and a key part of that process is mastering the art of taping corners and angles. In this article, we’ll share expert techniques to help you achieve professional-grade results when taping drywall in these tricky areas.


1. Understanding the Importance of Corner Taping

Corners and angles are the most vulnerable areas in drywall installations. Without proper taping and finishing, these spots can crack, chip, or show unsightly seams over time. By taking the time to tape corners correctly, you not only enhance the aesthetic appeal of your walls but also improve their durability and longevity.


2. Tools and Materials You’ll Need

Before starting your corner taping project, make sure you have the right tools and materials on hand:

  • Drywall Tape: Paper tape or mesh tape, depending on your preference.
  • Joint Compound: All-purpose or lightweight compound for smooth application.
  • Corner Bead: Metal or plastic corner bead for outside corners.
  • Broad Knife: A 6-inch and 12-inch knife for applying and smoothing joint compound.
  • Taping Knife: A specialized tool for pressing tape into corners.
  • Utility Knife: For cutting tape and trimming edges.
  • Sandpaper: Fine-grit sandpaper for smoothing the final coat.


3. Taping Inside Corners

Inside corners, where two walls meet, require careful attention to ensure a clean, smooth finish. Follow these steps for a professional result:


Step 1: Apply the First Coat of Compound

Start by applying a thin layer of joint compound along both sides of the inside corner using a 6-inch broad knife. Be sure to smooth the compound evenly, extending it about 2 inches on either side of the corner.


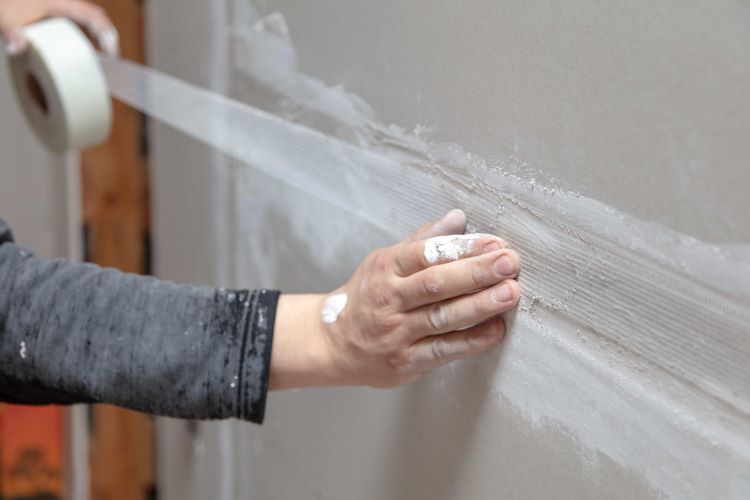
Step 2: Embed the Tape

Cut a length of drywall tape to fit the corner, then crease it down the middle to form a 90-degree angle. Press the tape into the corner, ensuring it adheres evenly along the entire length. Use a taping knife to smooth the tape, pressing it into the compound and eliminating any air bubbles or wrinkles.


Step 3: Apply Additional Coats of Compound

Once the first coat has dried, apply a second, wider coat of joint compound over the tape. Feather the edges out further from the corner, using a 12-inch knife for a smoother transition. Allow this coat to dry, then apply a third, final coat, feathering the edges even more.


Step 4: Sand the Surface

After the final coat has dried, lightly sand the surface to smooth out any imperfections. Be careful not to over-sand, as this can damage the tape or the drywall beneath.


4. Taping Outside Corners

Outside corners, where walls form an external angle, require reinforcement with a corner bead to protect against impact and wear. Here’s how to tape and finish outside corners:


Step 1: Install the Corner Bead

Measure and cut a piece of corner bead to fit the length of the corner. Attach the bead to the drywall using nails or screws, ensuring it’s straight and securely fastened.


Step 2: Apply the First Coat of Compound

Using a 6-inch knife, apply a coat of joint compound over the corner bead, covering the metal or plastic entirely. Smooth the compound, feathering it out about 2 to 3 inches from the corner on both sides.


Step 3: Apply Additional Coats of Compound

Allow the first coat to dry, then apply a second, wider coat of compound. This time, feather the edges out further, using a 12-inch knife. After the second coat dries, apply a third and final coat, feathering the edges to blend seamlessly with the surrounding wall.


Step 4: Sand and Finish

Once the final coat is completely dry, sand the surface lightly to remove any ridges or imperfections. The goal is to achieve a smooth, even finish that blends seamlessly into the wall.


5. Dealing with Difficult Angles

Odd angles, such as those found in vaulted ceilings or unconventional architectural features, can be particularly challenging. For these angles, consider using flexible corner tape, which is designed to bend and conform to various angles.


Step 1: Apply Compound and Tape

As with standard inside corners, apply a layer of joint compound to the angle, then press the flexible tape into place. Use a taping knife to smooth the tape and embed it in the compound.


Step 2: Build Up the Compound

Apply additional coats of joint compound, feathering the edges with each layer to blend the angle smoothly into the surrounding drywall. Take extra care when sanding these areas, as the tape can be more prone to damage on unconventional angles.


6. Final Tips for a Flawless Finish

  • Work in Small Sections: When taping corners, it’s often easier to work in manageable sections rather than trying to cover too much area at once.


  • Use Consistent Pressure: Applying consistent pressure when embedding the tape ensures a uniform finish and helps prevent bubbles or wrinkles.


  • Allow Adequate Drying Time: Rushing through coats can lead to poor adhesion and a rough finish. Allow each coat to dry fully before applying the next.


  • Inspect and Touch Up: After sanding, inspect your work for any missed spots or imperfections. Touch up as needed with additional compound and a light sanding.


Conclusion

Taping corners and angles in drywall may seem like a daunting task, but with the right techniques and a bit of practice, you can achieve a seamless, professional finish. At Windsor Drywallers, we pride ourselves on delivering high-quality drywall services that stand the test of time. Whether you’re tackling a DIY project or need expert assistance, our team is here to ensure your drywall installation is flawless from start to finish.


Contact Windsor Drywallers today to learn more about our services and how we can help you achieve the perfect finish for your home or business.

You might also like

December 2, 2024
Proper insulation is essential for a comfortable and energy-efficient home, especially in Windsor, Ontario, where temperature fluctuations can be significant. While drywall insulation is designed to last for many years, there comes a point when an upgrade becomes necessary. Knowing when to upgrade your drywall insulation can save you money, improve indoor comfort, and even enhance your home's value. Signs It's Time to Upgrade Your Drywall Insulation 1. Increased Energy Bills If your heating or cooling costs have been steadily rising without significant changes in usage, your insulation may no longer be performing efficiently. Poor insulation allows heat to escape in the winter and seep in during the summer, forcing your HVAC system to work harder. 2. Uncomfortable Temperature Fluctuations Uneven temperatures between rooms or floors often indicate gaps or deteriorating insulation within your walls. Upgrading your drywall insulation can help maintain a consistent temperature throughout your home. 3. Drafts or Cold Spots Feeling drafts near walls or cold spots in certain areas? These are classic signs of insufficient or aging insulation, which can no longer create a proper thermal barrier. 4. Visible Signs of Damage If you notice water stains, mold, or mildew on your walls, your insulation could be compromised. Moisture not only damages insulation but can also lead to health hazards like mold growth. 5. Home Renovations Any time you’re remodeling or updating parts of your home, it’s worth assessing the condition of your drywall insulation. Renovations provide a great opportunity to upgrade to modern, energy-efficient materials. 6. Older Home Construction Homes built before the 1980s often have outdated insulation materials that don’t meet today’s energy standards. If your home is older, consider upgrading to newer, more efficient insulation options. Benefits of Upgrading Drywall Insulation 1. Improved Energy Efficiency Modern insulation materials are designed to provide superior thermal performance, reducing heat loss and lowering energy bills. 2. Enhanced Comfort With upgraded insulation, your home will maintain a more consistent temperature, eliminating hot or cold spots. 3. Increased Property Value Energy-efficient homes are highly attractive to potential buyers. Upgraded insulation can be a selling point, especially in Windsor's competitive real estate market. 4. Better Soundproofing High-quality drywall insulation doesn’t just regulate temperature—it also reduces noise transfer, making your home quieter and more serene. 5. Long-Term Savings While there’s an upfront cost to upgrading, improved energy efficiency translates to significant savings over time on utility bills. Types of Drywall Insulation to Consider When upgrading your insulation, you’ll encounter several options, each with unique benefits: 1. Fiberglass Insulation Cost-effective and widely used. Provides excellent thermal resistance. Often available in batts or loose-fill. 2. Spray Foam Insulation Expands to fill gaps and cracks. Offers superior air sealing and thermal performance. Ideal for hard-to-reach areas. 3. Mineral Wool Insulation Fire-resistant and excellent for soundproofing. Durable and water-resistant, making it great for moisture-prone areas. 4. Rigid Foam Boards High thermal resistance in a compact form. Useful for exterior walls or specific problem areas. When to Call a Professional While small upgrades like sealing gaps with spray foam can be DIY projects, replacing or upgrading drywall insulation is best left to professionals. A certified insulation contractor, like Windsor Drywallers , can assess your current insulation, recommend the best materials, and ensure proper installation. The Process of Upgrading Drywall Insulation Assessment A thorough inspection of your current insulation to identify problem areas and determine the best upgrade options. Removal If your existing insulation is damaged or outdated, it will be safely removed to prevent contamination or further damage. Installation New insulation is installed with precision, ensuring full coverage and optimal thermal performance. Drywall Replacement Once the insulation is upgraded, new drywall is installed and finished seamlessly, restoring your walls to their original appearance. Why Choose Windsor Drywallers? At Windsor Drywallers, we specialize in drywall and insulation services tailored to the unique needs of Windsor homeowners. With years of experience and a commitment to quality, we ensure that your insulation upgrade is handled efficiently and professionally. Whether you’re battling high energy bills or preparing for a renovation, we’re here to help. Contact us today for an inspection and discover how upgraded insulation can transform your home! Conclusion Upgrading your drywall insulation is more than just a maintenance task—it’s an investment in your home’s comfort, efficiency, and value. If you’re noticing signs of wear or preparing for a renovation, now is the time to take action. Trust Windsor Drywallers to deliver the expertise and quality you deserve.
November 26, 2024
Water damage is one of the most common and destructive issues homeowners face. In Windsor, Ontario, the seasonal weather changes and occasional heavy rainfall make homes particularly vulnerable. When water seeps into drywall and ceilings, it can cause severe structural and aesthetic problems. At Windsor Drywallers , we understand the importance of addressing water damage quickly and effectively. Here’s what you need to know about how water affects drywall and ceiling integrity and why professional repair is crucial. How Water Damages Drywall and Ceilings Drywall and ceilings are made of materials that are highly absorbent, such as gypsum board and plaster. When exposed to water, they quickly soak it up, leading to: Swelling and Warping Water causes drywall to expand and lose its shape, resulting in unsightly bulges or waves. This compromises the smooth, finished appearance of your walls and ceilings. Sagging Ceilings When water collects in the ceiling, it increases the weight and causes the material to sag or buckle. In severe cases, parts of the ceiling may collapse, posing safety risks. Stains and Discoloration Even minor water exposure can leave dark stains or discoloration on drywall and ceilings, which can ruin your interior aesthetics. Mold and Mildew Growth Damp drywall creates the perfect environment for mold and mildew to thrive. This not only damages your walls but also poses serious health risks, particularly for individuals with respiratory issues. Weakened Structural Integrity Prolonged exposure to water can erode the strength of drywall and ceiling materials, increasing the likelihood of cracks, holes, or further collapse. Common Causes of Water Damage Understanding the root causes of water damage can help homeowners prevent future issues. Common culprits include: Leaky Roofs: Rainwater or snowmelt can seep through damaged roofing materials. Plumbing Issues: Burst pipes, leaking fixtures, or clogged drains can lead to water pooling in walls and ceilings. Flooding: Heavy rains or basement floods can saturate lower walls and migrate upward. HVAC Problems: Poor ventilation or condensation buildup can contribute to moisture damage. Why Prompt Repairs Are Crucial Delaying repairs can exacerbate the damage, leading to: Increased Repair Costs: What begins as a minor repair can escalate into full wall or ceiling replacements. Health Risks: Mold and mildew can spread quickly, leading to more extensive remediation efforts. Compromised Home Value: Damaged drywall and ceilings diminish the appeal and structural reliability of your property. Steps for Repairing Water-Damaged Drywall and Ceilings At Windsor Drywallers, we follow a thorough process to ensure your home is restored to its original condition: Inspection and Assessment We begin by identifying the source of the water damage and assessing the extent of the issue. Drying and Dehumidification Using specialized equipment, we dry the affected areas to prevent further damage and mold growth. Removal of Damaged Material Warped or sagging drywall and ceiling panels are carefully removed and disposed of. Replacement and Patching New drywall or ceiling material is installed, and seams are taped and mudded for a seamless finish. Painting and Finishing Once the area is repaired, we repaint to match the rest of your interior, ensuring a flawless appearance. Preventing Future Water Damage To protect your drywall and ceilings: Address Leaks Promptly: Regularly inspect your roof, plumbing, and HVAC systems for signs of trouble. Improve Drainage: Ensure proper grading around your home and maintain gutters and downspouts. Control Indoor Humidity: Use dehumidifiers and proper ventilation to keep moisture levels in check. Conclusion Water damage to drywall and ceilings can have a significant impact on your home’s safety, aesthetics, and value. Addressing these issues quickly with professional help is essential to prevent long-term problems. At Windsor Drywallers , we specialize in water damage repair and restoration. Our expert team is ready to help you reclaim your space with reliable, high-quality repairs.  Contact us today for a free consultation and let us help you restore your home to its best condition!
November 18, 2024
Drywall installation is a critical step in achieving smooth, flawless walls and ceilings in your home. One of the most crucial aspects of this process is applying the right number of coats of joint compound, commonly known as "mud." If you've ever wondered how many coats of mud you need for perfect drywall, you're not alone. In this guide, Windsor Drywallers , your trusted local drywall experts in Windsor, Ontario, break down everything you need to know about achieving that seamless finish. Why Do You Need Multiple Coats of Drywall Mud? Applying drywall mud is essential for hiding seams, screws, and any imperfections on the surface of drywall sheets. The goal is to create a smooth, even surface that’s ready for priming and painting. The process involves multiple coats for several reasons: Filling in Gaps: The first coat is applied to fill in gaps between drywall sheets and cover screws. Building Up Layers: Subsequent coats are used to build up the surface and smooth out uneven areas. Feathering and Smoothing: The final coat ensures that edges are feathered and blended seamlessly into the wall. Skipping coats or applying too few can result in visible seams, dents, or uneven surfaces, which are particularly noticeable after painting. The Ideal Number of Coats: A Step-by-Step Guide The typical number of coats of drywall mud needed for a professional finish is three. Here's a breakdown of each coat and its purpose: 1. The First Coat: Filling and Taping The first coat, also known as the taping coat, is all about covering joints and screws while embedding drywall tape. This step is crucial for strengthening seams and preventing cracks. Materials Needed: All-purpose joint compound and drywall tape (either paper or mesh). Technique: Apply a generous amount of mud over the seams using a 4-6 inch taping knife. Press the drywall tape into the wet mud, smoothing it out to remove air bubbles. Cover the tape with a thin layer of mud to embed it. Apply mud over screw holes to conceal them. Drying Time: Let it dry for 24 hours before moving to the next coat. 2. The Second Coat: Building and Smoothing The second coat is known as the filling coat, which helps to smooth out imperfections and build up the surface. Materials Needed: All-purpose or lightweight joint compound. Technique: Use a wider knife (8-10 inches) to apply mud over the seams, feathering the edges. Smooth out any ridges or bumps from the first coat. Add additional mud to screw holes and corners if needed. Drying Time: Allow 24 hours for drying before proceeding to the final coat. 3. The Third Coat: Finishing and Feathering The third and final coat is the finishing coat. This coat focuses on feathering the edges and achieving a smooth, seamless finish. Materials Needed: Lightweight joint compound for easier sanding. Technique: Use a 12-inch knife to apply a thin layer of mud, feathering out the edges for a smooth transition. Ensure all seams, corners, and screws are completely covered and blended. Lightly sand between coats if necessary to remove any high spots. Drying Time: Let it dry thoroughly (usually 24 hours) before sanding and priming. Additional Tips for a Perfect Drywall Finish Sanding Between Coats: For the best results, lightly sand the surface between coats to remove any bumps or ridges. Use fine-grit sandpaper (120-150 grit) to achieve a smooth finish. Patience is Key: Allow each coat to dry completely before applying the next one. Rushing the process can lead to cracks and uneven surfaces. Choose the Right Joint Compound: All-purpose joint compound is great for all coats, but a lightweight compound is easier to work with for the final coat and sanding. Feathering Edges: Feather the edges of each coat wider than the previous one. This technique helps blend the compound into the drywall, making the seams disappear. When Are Additional Coats Needed? While three coats are typically sufficient for most drywall projects, certain situations may require additional coats: Large Gaps or Damage: If you’re repairing significant damage or large gaps, you might need an extra coat to build up the surface. Textured Walls: If you’re matching an existing texture, additional coats may be needed to achieve the desired effect. High-End Finishes: For ultra-smooth finishes, such as those required for glossy paint or specific design features, a fourth coat may be necessary. Tools You’ll Need for Drywall Mud Application Here’s a quick checklist of must-have tools for drywall mud application: Taping knife set (4, 6, 8, 10, and 12-inch knives) Drywall mud pan Sanding sponge or sandpaper (120-150 grit) Joint compound (all-purpose for the first two coats, lightweight for the final coat) Drywall tape (paper or mesh) Dust mask and safety goggles (for sanding) Investing in quality tools can make the job easier and help achieve a professional finish. Trust the Experts at Windsor Drywallers Drywall finishing is a skill that requires practice, patience, and the right technique. If you’re looking for a seamless, professional finish, trust the experts at Windsor Drywallers. Our team has years of experience in drywall installation and repair, ensuring that your walls look perfect every time. Whether it’s a new construction project or a home renovation, we have the skills and expertise to handle it all. Contact us today for a free estimate and let’s transform your space into a beautifully finished area.  Ready to Transform Your Space? At Windsor Drywallers , we’re dedicated to providing high-quality drywall services in Windsor, Ontario. From repairs to full installations, we’ve got you covered. Get in touch today to learn how we can help with your next project!
More Posts

Book a Service Today

Share by: