Blog Layout

How Drywall Insulation Can Lower Your Energy Bills Year-Round

September 1, 2024

With energy costs rising, homeowners are constantly seeking ways to make their homes more energy-efficient. One of the most effective ways to achieve this is through proper insulation. While many people think of insulation in terms of the attic or exterior walls, drywall insulation plays a crucial role in maintaining a comfortable temperature in your home and keeping energy bills in check. At Windsor Drywallers, we understand the importance of quality insulation and how it can significantly impact your home's energy efficiency. Here’s how drywall insulation can help lower your energy bills year-round.


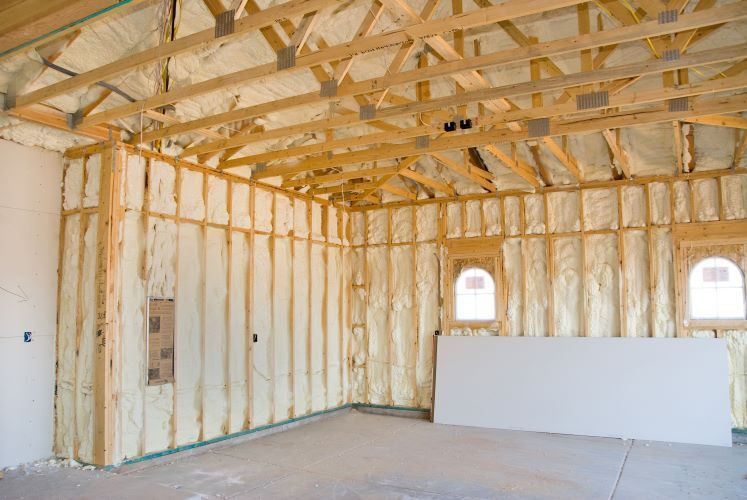
1. Understanding Drywall Insulation

Drywall insulation involves installing insulation materials behind the drywall to prevent heat transfer between the inside and outside of your home. This insulation acts as a barrier, keeping warm air inside during the winter and cool air inside during the summer. By reducing the amount of heat that escapes or enters your home, drywall insulation helps to maintain a consistent indoor temperature, which in turn reduces the need for constant heating or cooling.


2. Benefits of Drywall Insulation for Energy Efficiency

a. Improved Thermal Regulation

One of the primary benefits of drywall insulation is its ability to regulate the temperature within your home. Without proper insulation, your heating and cooling systems have to work harder to maintain a comfortable temperature, leading to higher energy consumption. By adding insulation behind your drywall, you can keep your home warmer in the winter and cooler in the summer with less effort from your HVAC system. This improved thermal regulation means that your heating and cooling systems will run less frequently, saving you money on your energy bills.


b. Enhanced Air Sealing

Drywall insulation also helps to seal gaps and cracks in your walls that can lead to drafts and air leakage. When warm air escapes during the winter or cool air seeps out during the summer, your HVAC system has to work overtime to compensate for the loss, resulting in increased energy usage. Proper insulation creates a tight seal that minimizes air leakage, allowing your home to maintain its temperature more efficiently. This enhanced air sealing reduces the strain on your heating and cooling systems and leads to lower energy costs.


c. Soundproofing Benefits

In addition to its energy-saving properties, drywall insulation also offers soundproofing benefits. Insulated walls can significantly reduce the amount of noise that enters or exits your home, creating a more peaceful and quiet living environment. This is particularly beneficial in urban areas or for homes near busy streets. The added soundproofing not only enhances comfort but also contributes to the overall energy efficiency of your home by ensuring that windows and doors are tightly sealed.


3. Types of Drywall Insulation

When considering drywall insulation, it’s important to choose the right type of insulation material for your needs. Here are some common types of insulation used in drywall installation:


a. Fiberglass Insulation

Fiberglass insulation is one of the most commonly used materials for drywall insulation. It is made from fine glass fibers and is available in rolls or batts that can be easily installed between wall studs. Fiberglass is known for its excellent thermal performance and is an affordable option for most homeowners.


b. Spray Foam Insulation

Spray foam insulation is a more advanced option that provides superior air sealing and thermal resistance. It is applied as a liquid and expands to fill gaps and cracks, creating an airtight barrier. While spray foam insulation is more expensive than fiberglass, its high R-value (a measure of thermal resistance) makes it a worthwhile investment for homeowners looking to maximize energy efficiency.


c. Cellulose Insulation

Cellulose insulation is made from recycled paper products and is treated with fire retardants for safety. It is often used in older homes where retrofitting insulation is necessary. Cellulose is an eco-friendly option that offers good thermal performance and is particularly effective at reducing air leakage.


d. Rigid Foam Insulation

Rigid foam insulation comes in panels that can be cut to fit between wall studs. It has a high R-value and provides excellent thermal resistance. Rigid foam is a good option for homeowners looking to add insulation to exterior walls or basements where moisture resistance is important.


4. Long-Term Savings

While the initial cost of installing drywall insulation may seem significant, the long-term savings on energy bills make it a smart investment. Proper insulation can reduce your heating and cooling costs by up to 20%, depending on the climate and the level of insulation installed. Over time, these savings can add up, making the investment in drywall insulation well worth it.


Additionally, homes with good insulation tend to have higher resale values. Prospective buyers are often willing to pay more for a home that is energy-efficient and has lower utility costs. This means that in addition to saving money on your own energy bills, you could also see a return on your investment when it comes time to sell your home.


5. Professional Installation Matters

While some homeowners may attempt to install insulation themselves, hiring a professional is essential for ensuring that the job is done correctly. Improper installation can lead to gaps, voids, and other issues that reduce the effectiveness of the insulation. At Windsor Drywallers, our team of experts has the experience and knowledge to install drywall insulation properly, ensuring that your home is as energy-efficient as possible.


Conclusion

Drywall insulation is a key component in making your home more energy-efficient and reducing your energy bills year-round. By improving thermal regulation, enhancing air sealing, and offering soundproofing benefits, drywall insulation can provide significant long-term savings. Whether you’re building a new home or looking to upgrade your current insulation, investing in quality drywall insulation is a smart decision that will pay off in the years to come.


At Windsor Drywallers, we specialize in providing high-quality drywall installation and insulation services for homeowners in Windsor, Ontario. Contact us today to learn more about how we can help you make your home more energy-efficient and comfortable.

You might also like

December 2, 2024
Proper insulation is essential for a comfortable and energy-efficient home, especially in Windsor, Ontario, where temperature fluctuations can be significant. While drywall insulation is designed to last for many years, there comes a point when an upgrade becomes necessary. Knowing when to upgrade your drywall insulation can save you money, improve indoor comfort, and even enhance your home's value. Signs It's Time to Upgrade Your Drywall Insulation 1. Increased Energy Bills If your heating or cooling costs have been steadily rising without significant changes in usage, your insulation may no longer be performing efficiently. Poor insulation allows heat to escape in the winter and seep in during the summer, forcing your HVAC system to work harder. 2. Uncomfortable Temperature Fluctuations Uneven temperatures between rooms or floors often indicate gaps or deteriorating insulation within your walls. Upgrading your drywall insulation can help maintain a consistent temperature throughout your home. 3. Drafts or Cold Spots Feeling drafts near walls or cold spots in certain areas? These are classic signs of insufficient or aging insulation, which can no longer create a proper thermal barrier. 4. Visible Signs of Damage If you notice water stains, mold, or mildew on your walls, your insulation could be compromised. Moisture not only damages insulation but can also lead to health hazards like mold growth. 5. Home Renovations Any time you’re remodeling or updating parts of your home, it’s worth assessing the condition of your drywall insulation. Renovations provide a great opportunity to upgrade to modern, energy-efficient materials. 6. Older Home Construction Homes built before the 1980s often have outdated insulation materials that don’t meet today’s energy standards. If your home is older, consider upgrading to newer, more efficient insulation options. Benefits of Upgrading Drywall Insulation 1. Improved Energy Efficiency Modern insulation materials are designed to provide superior thermal performance, reducing heat loss and lowering energy bills. 2. Enhanced Comfort With upgraded insulation, your home will maintain a more consistent temperature, eliminating hot or cold spots. 3. Increased Property Value Energy-efficient homes are highly attractive to potential buyers. Upgraded insulation can be a selling point, especially in Windsor's competitive real estate market. 4. Better Soundproofing High-quality drywall insulation doesn’t just regulate temperature—it also reduces noise transfer, making your home quieter and more serene. 5. Long-Term Savings While there’s an upfront cost to upgrading, improved energy efficiency translates to significant savings over time on utility bills. Types of Drywall Insulation to Consider When upgrading your insulation, you’ll encounter several options, each with unique benefits: 1. Fiberglass Insulation Cost-effective and widely used. Provides excellent thermal resistance. Often available in batts or loose-fill. 2. Spray Foam Insulation Expands to fill gaps and cracks. Offers superior air sealing and thermal performance. Ideal for hard-to-reach areas. 3. Mineral Wool Insulation Fire-resistant and excellent for soundproofing. Durable and water-resistant, making it great for moisture-prone areas. 4. Rigid Foam Boards High thermal resistance in a compact form. Useful for exterior walls or specific problem areas. When to Call a Professional While small upgrades like sealing gaps with spray foam can be DIY projects, replacing or upgrading drywall insulation is best left to professionals. A certified insulation contractor, like Windsor Drywallers , can assess your current insulation, recommend the best materials, and ensure proper installation. The Process of Upgrading Drywall Insulation Assessment A thorough inspection of your current insulation to identify problem areas and determine the best upgrade options. Removal If your existing insulation is damaged or outdated, it will be safely removed to prevent contamination or further damage. Installation New insulation is installed with precision, ensuring full coverage and optimal thermal performance. Drywall Replacement Once the insulation is upgraded, new drywall is installed and finished seamlessly, restoring your walls to their original appearance. Why Choose Windsor Drywallers? At Windsor Drywallers, we specialize in drywall and insulation services tailored to the unique needs of Windsor homeowners. With years of experience and a commitment to quality, we ensure that your insulation upgrade is handled efficiently and professionally. Whether you’re battling high energy bills or preparing for a renovation, we’re here to help. Contact us today for an inspection and discover how upgraded insulation can transform your home! Conclusion Upgrading your drywall insulation is more than just a maintenance task—it’s an investment in your home’s comfort, efficiency, and value. If you’re noticing signs of wear or preparing for a renovation, now is the time to take action. Trust Windsor Drywallers to deliver the expertise and quality you deserve.
November 26, 2024
Water damage is one of the most common and destructive issues homeowners face. In Windsor, Ontario, the seasonal weather changes and occasional heavy rainfall make homes particularly vulnerable. When water seeps into drywall and ceilings, it can cause severe structural and aesthetic problems. At Windsor Drywallers , we understand the importance of addressing water damage quickly and effectively. Here’s what you need to know about how water affects drywall and ceiling integrity and why professional repair is crucial. How Water Damages Drywall and Ceilings Drywall and ceilings are made of materials that are highly absorbent, such as gypsum board and plaster. When exposed to water, they quickly soak it up, leading to: Swelling and Warping Water causes drywall to expand and lose its shape, resulting in unsightly bulges or waves. This compromises the smooth, finished appearance of your walls and ceilings. Sagging Ceilings When water collects in the ceiling, it increases the weight and causes the material to sag or buckle. In severe cases, parts of the ceiling may collapse, posing safety risks. Stains and Discoloration Even minor water exposure can leave dark stains or discoloration on drywall and ceilings, which can ruin your interior aesthetics. Mold and Mildew Growth Damp drywall creates the perfect environment for mold and mildew to thrive. This not only damages your walls but also poses serious health risks, particularly for individuals with respiratory issues. Weakened Structural Integrity Prolonged exposure to water can erode the strength of drywall and ceiling materials, increasing the likelihood of cracks, holes, or further collapse. Common Causes of Water Damage Understanding the root causes of water damage can help homeowners prevent future issues. Common culprits include: Leaky Roofs: Rainwater or snowmelt can seep through damaged roofing materials. Plumbing Issues: Burst pipes, leaking fixtures, or clogged drains can lead to water pooling in walls and ceilings. Flooding: Heavy rains or basement floods can saturate lower walls and migrate upward. HVAC Problems: Poor ventilation or condensation buildup can contribute to moisture damage. Why Prompt Repairs Are Crucial Delaying repairs can exacerbate the damage, leading to: Increased Repair Costs: What begins as a minor repair can escalate into full wall or ceiling replacements. Health Risks: Mold and mildew can spread quickly, leading to more extensive remediation efforts. Compromised Home Value: Damaged drywall and ceilings diminish the appeal and structural reliability of your property. Steps for Repairing Water-Damaged Drywall and Ceilings At Windsor Drywallers, we follow a thorough process to ensure your home is restored to its original condition: Inspection and Assessment We begin by identifying the source of the water damage and assessing the extent of the issue. Drying and Dehumidification Using specialized equipment, we dry the affected areas to prevent further damage and mold growth. Removal of Damaged Material Warped or sagging drywall and ceiling panels are carefully removed and disposed of. Replacement and Patching New drywall or ceiling material is installed, and seams are taped and mudded for a seamless finish. Painting and Finishing Once the area is repaired, we repaint to match the rest of your interior, ensuring a flawless appearance. Preventing Future Water Damage To protect your drywall and ceilings: Address Leaks Promptly: Regularly inspect your roof, plumbing, and HVAC systems for signs of trouble. Improve Drainage: Ensure proper grading around your home and maintain gutters and downspouts. Control Indoor Humidity: Use dehumidifiers and proper ventilation to keep moisture levels in check. Conclusion Water damage to drywall and ceilings can have a significant impact on your home’s safety, aesthetics, and value. Addressing these issues quickly with professional help is essential to prevent long-term problems. At Windsor Drywallers , we specialize in water damage repair and restoration. Our expert team is ready to help you reclaim your space with reliable, high-quality repairs.  Contact us today for a free consultation and let us help you restore your home to its best condition!
November 18, 2024
Drywall installation is a critical step in achieving smooth, flawless walls and ceilings in your home. One of the most crucial aspects of this process is applying the right number of coats of joint compound, commonly known as "mud." If you've ever wondered how many coats of mud you need for perfect drywall, you're not alone. In this guide, Windsor Drywallers , your trusted local drywall experts in Windsor, Ontario, break down everything you need to know about achieving that seamless finish. Why Do You Need Multiple Coats of Drywall Mud? Applying drywall mud is essential for hiding seams, screws, and any imperfections on the surface of drywall sheets. The goal is to create a smooth, even surface that’s ready for priming and painting. The process involves multiple coats for several reasons: Filling in Gaps: The first coat is applied to fill in gaps between drywall sheets and cover screws. Building Up Layers: Subsequent coats are used to build up the surface and smooth out uneven areas. Feathering and Smoothing: The final coat ensures that edges are feathered and blended seamlessly into the wall. Skipping coats or applying too few can result in visible seams, dents, or uneven surfaces, which are particularly noticeable after painting. The Ideal Number of Coats: A Step-by-Step Guide The typical number of coats of drywall mud needed for a professional finish is three. Here's a breakdown of each coat and its purpose: 1. The First Coat: Filling and Taping The first coat, also known as the taping coat, is all about covering joints and screws while embedding drywall tape. This step is crucial for strengthening seams and preventing cracks. Materials Needed: All-purpose joint compound and drywall tape (either paper or mesh). Technique: Apply a generous amount of mud over the seams using a 4-6 inch taping knife. Press the drywall tape into the wet mud, smoothing it out to remove air bubbles. Cover the tape with a thin layer of mud to embed it. Apply mud over screw holes to conceal them. Drying Time: Let it dry for 24 hours before moving to the next coat. 2. The Second Coat: Building and Smoothing The second coat is known as the filling coat, which helps to smooth out imperfections and build up the surface. Materials Needed: All-purpose or lightweight joint compound. Technique: Use a wider knife (8-10 inches) to apply mud over the seams, feathering the edges. Smooth out any ridges or bumps from the first coat. Add additional mud to screw holes and corners if needed. Drying Time: Allow 24 hours for drying before proceeding to the final coat. 3. The Third Coat: Finishing and Feathering The third and final coat is the finishing coat. This coat focuses on feathering the edges and achieving a smooth, seamless finish. Materials Needed: Lightweight joint compound for easier sanding. Technique: Use a 12-inch knife to apply a thin layer of mud, feathering out the edges for a smooth transition. Ensure all seams, corners, and screws are completely covered and blended. Lightly sand between coats if necessary to remove any high spots. Drying Time: Let it dry thoroughly (usually 24 hours) before sanding and priming. Additional Tips for a Perfect Drywall Finish Sanding Between Coats: For the best results, lightly sand the surface between coats to remove any bumps or ridges. Use fine-grit sandpaper (120-150 grit) to achieve a smooth finish. Patience is Key: Allow each coat to dry completely before applying the next one. Rushing the process can lead to cracks and uneven surfaces. Choose the Right Joint Compound: All-purpose joint compound is great for all coats, but a lightweight compound is easier to work with for the final coat and sanding. Feathering Edges: Feather the edges of each coat wider than the previous one. This technique helps blend the compound into the drywall, making the seams disappear. When Are Additional Coats Needed? While three coats are typically sufficient for most drywall projects, certain situations may require additional coats: Large Gaps or Damage: If you’re repairing significant damage or large gaps, you might need an extra coat to build up the surface. Textured Walls: If you’re matching an existing texture, additional coats may be needed to achieve the desired effect. High-End Finishes: For ultra-smooth finishes, such as those required for glossy paint or specific design features, a fourth coat may be necessary. Tools You’ll Need for Drywall Mud Application Here’s a quick checklist of must-have tools for drywall mud application: Taping knife set (4, 6, 8, 10, and 12-inch knives) Drywall mud pan Sanding sponge or sandpaper (120-150 grit) Joint compound (all-purpose for the first two coats, lightweight for the final coat) Drywall tape (paper or mesh) Dust mask and safety goggles (for sanding) Investing in quality tools can make the job easier and help achieve a professional finish. Trust the Experts at Windsor Drywallers Drywall finishing is a skill that requires practice, patience, and the right technique. If you’re looking for a seamless, professional finish, trust the experts at Windsor Drywallers. Our team has years of experience in drywall installation and repair, ensuring that your walls look perfect every time. Whether it’s a new construction project or a home renovation, we have the skills and expertise to handle it all. Contact us today for a free estimate and let’s transform your space into a beautifully finished area.  Ready to Transform Your Space? At Windsor Drywallers , we’re dedicated to providing high-quality drywall services in Windsor, Ontario. From repairs to full installations, we’ve got you covered. Get in touch today to learn how we can help with your next project!
More Posts

Book a Service Today

Share by: